
Introduction
This is part two of our series on MuleSoft CI/CD. In the previous chapter, we discussed the introduction of MuleSoft CI/CD and Git Branching Strategies.
In this chapter, we will discuss the following topics.
- Recap on part one and Custom Branching Strategy Release Plan
- What is Continuous Integration?
- MuleSoft Continuous Integration(CI) implementation in GitHub Actions
Recap on part one and Custom Branching Strategy Release Plan:
- In part one of the blog, we discussed CI/CD and Git Branching strategies.
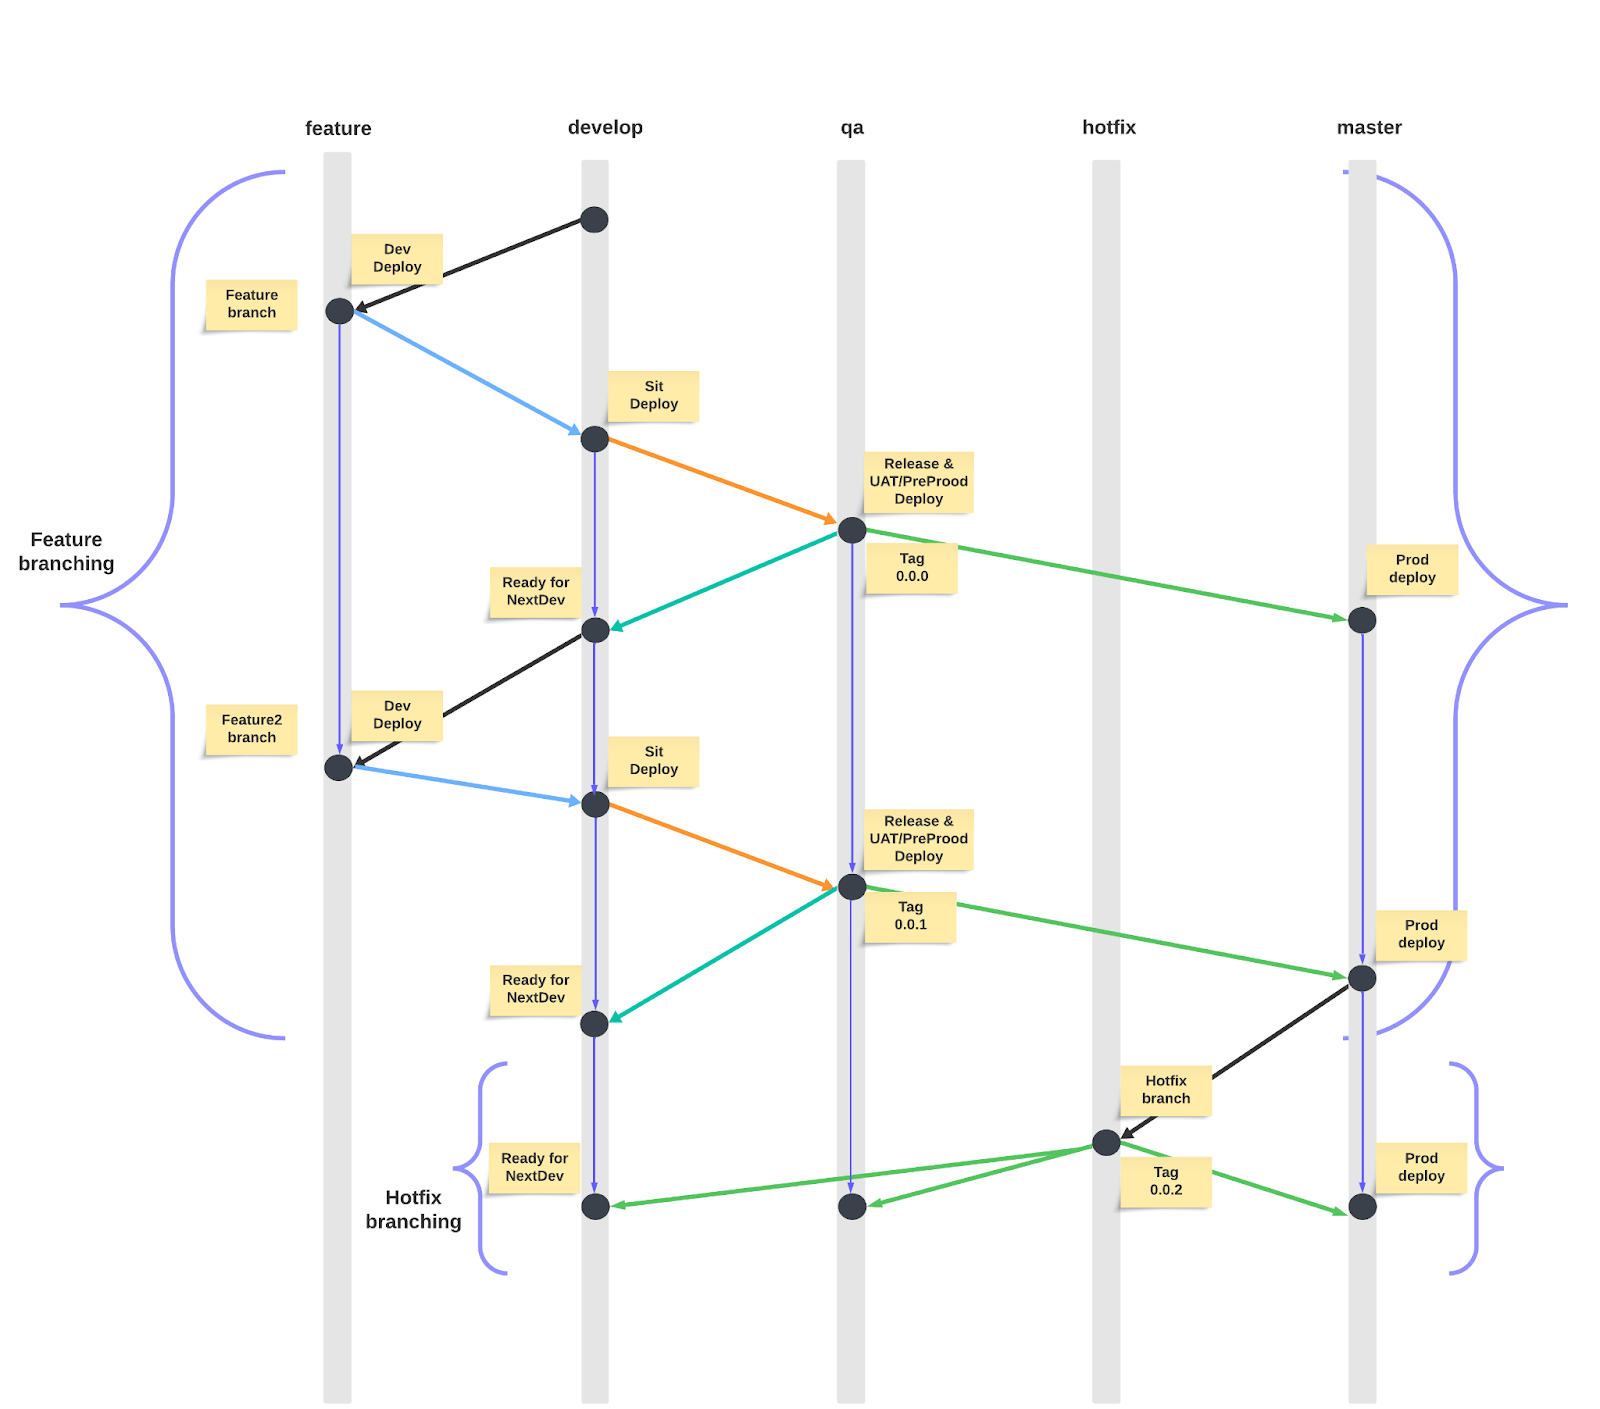
- Let’s now look at the Custom Branching strategy and try to implement the entire build/release and deploy components of it using GitHub Actions.
- As we have already discussed the Custom Branching Strategy in the last blog, let’s break down the CI/CD pipeline workflows that we need to implement:
- A workflow that compiles and tests the Project and deploys it to the Dev environment when any changes happen to the feature/* branches.
- The developer does the dev tests, and once the developer is happy, they will merge the feature to develop the branch. The source code from the develop branch needs to be deployed to the SIT environment. This allows us to build the following workflow.
- A workflow that compiles/tests the Project and deploys it to the SIT environment when any changes happen to the develop branch.
- Testers do the end-to-end integration testing in the SIT environment and sign off on the feature.
- The developer needs to merge the develop branch to a branch where the release happens for the source code.
- This is the place where we need a workflow to run the same compile/build/unit tests again and do the release on the Project. Preparing the release means removing the artefact SNAPSHOT version and creating a tag with the release version.
- A workflow to compile and test the Project (QA) and then release the Project with their release activities(versioning and tagging) and make the tag available for the next UAT/Prod deployment.
- This workflow will produce the release candidate available for the Operations team to deploy the Project to higher (UAT/Prod) environments.
- So, here, we need a manual trigger-based workflow/Action to deploy the released tag to higher environments(UAT/Prod). This also needs to ensure the same QA branch source code change is merged to the master once the Production deployment is completed.
- A manual workflow to take the release version/tag and deploy it to a selected higher environment of choice(UAT/Prod). Also, this workflow needs to merge the same QA branch change to the master branch once the Production deployment has been completed.
- A workflow that compiles and tests the Project and deploys it to the Dev environment when any changes happen to the feature/* branches.
- We have a total of four workflows to be built to deliver the entire CI/CD pipeline.
- In this chapter, we will see the first two workflows from the “MuleSoft CI implementation in GitHub Action” section.
- The first one is to compile/test/run unit tests and deploy the Project in the Dev environment when any change happens to feature/* branches.
- The second one is to compile/test/run unit tests and deploy the Project in the SIT environment when any change happens to the develop branch.
- The next two workflows(mentioned below) will be discussed in the next blog part of “MuleSoft CI/CD Part-III Continuous Delivery/Deployment”.
- The third one is to clean/compile/test the Project and release the Project with the release activities(versioning and tagging) and make the tag available for the next UAT/Prod deployment when any change happens to the QA branch.
- The fourth is a manual workflow to take the release version/tag and deploy it to a selected higher environment of choice(UAT/Prod) and merge the change from the QA branch to the master branch.
What is Continuous Integration?
- The “CI” in CI/CD refers to Continuous Integration (CI), an automation process for developers to build the application for any changes continuously.
- Continuous Integration (CI) is a development practice where developers integrate code into a shared repository frequently. Each code integration can then be verified by an automated build and automated tests (not mandatorily auto-tested, but most organisations do follow automated tests).
- One of the key benefits of Continuous Integration (CI) is that we can detect defects early and quickly.
- As each change is typically small, pinpointing the specific change that introduced the defect can be done quickly.
- Usually, Continuous Integration (CI) has the following tasks:
- Checkout source code of the Project
- Compile the Project
- Run the unit tests
- Deploy the Project to the Dev environment
- We will see these tasks or CI steps in the next section, where we implement these steps for the MuleSoft API in GitHub Actions.
MuleSoft Continuous Integration(CI) implementation in GitHub Actions
We will implement the first GitHub Actions Workflow to compile/test and deploy the Project in the Dev environment when any change happens to feature/* branches.
We will set up the GitHub Action by following the below steps:
- Setup your Repository
- Setup the environments on the Repository
- Setup the environment variables on the Repository
- Run the pipeline
Note: We are not storing the artifacts by building them separately for deploying them to environments instead, We are building and deploying in one step.
Setup your Repository:
- We won’t go into the details of setting up the repository here. You can take a look at the mule4-hello-world-impl repo, which we will be using here for our CI implementation.
- Once you have the GitHub repository, Create a folder called .github and inside it another folder called workflows. Here, We will create dev-deploy.yaml and add the following content.
name: Dev Deploy
run-name: Dev Build and Deployment
on:
push:
branches: [ feature/* ]
jobs:
build-dev:
environment: dev
runs-on: ubuntu-latest
steps:
– name: Checkout this repo
uses: actions/checkout@v4
– name: Cache dependencies
uses: actions/cache@v3.3.2
with:
path: ~/.m2/repository
key: ${{ runner.os }}-maven
restore-keys: |
${{ runner.os }}-maven-
– name: Set up JDK 1.8
uses: actions/setup-java@v3
with:
distribution: ‘zulu’
java-version: 8
– name: Clean with Maven
run: mvn clean compile
– name: Run Munit tests
run: mvn test
– name: Deploy to Dev environment
env:
ENV: ${{ vars.env }}
USERNAME: ${{ secrets.anypoint_username }}
PASSWORD: ${{ secrets.anypoint_password }}
ANYPOINT_USERNAME: ${{ secrets.anypoint_platform_username }}
ANYPOINT_PASSWORD: ${{ secrets.anypoint_platform_password }}
run: |
artifactName=$(ls *.jar | head -1)
mvn deploy -s .maven/settings.xml -f pom.xml -DmuleDeploy \
-Denv=$ENV \
-Dmule.artifact=$artifactName \
-Danypoint.username=”$USERNAME” \
-Danypoint.password=”$PASSWORD” \
-Danypoint_platform_username=”$ANYPOINT_USERNAME” \
-Danypoint_platform_password=”$ANYPOINT_PASSWORD”
- This file explains the CI steps to be performed on the MuleSoft API repository once any commit goes into the branches whose names start with feature/*.
- Content of the file:
- The name field holds the name of the GitHub Action, which will appear in the UI under the Actions tab.
- The on field tells when a GitHub Action runs. For this Action, We have set it up to run when any commit happens on the branches whose name starts with the feature.
- A GitHub Action workflow is made up of jobs. Jobs will always run in parallel unless we mention any particular job with the needs keyword. A Job can have multiple steps to run in the workflow.
- For more information on GitHub Actions, you can refer to GitHub Actions.
- The first step is to check out the repository.
– name: Checkout this repo
uses: actions/checkout@v4
- The second step caches the maven dependencies to make the subsequent runs to use the cached dependencies.
– name: Cache dependencies
uses: actions/cache@v3.3.2
with:
path: ~/.m2/repository
key: ${{ runner.os }}-maven
- The third step sets the JDK version in the container where Github runs this GitHub Action.
– name: Set up JDK 1.8
uses: actions/setup-java@v3
with:
distribution: ‘zulu’
java-version: 8
- The fourth step runs clean and compiles the Project using the maven lifecycle and phase.
– name: Clean with Maven
run: mvn clean compile
- The fifth step runs the unit tests(Munits) of the Project.
– name: Run Munit tests
run: mvn test -Denv=dev
- The last step builds the project and deploys the built jar file to CloudHub.
– name: Deploy to Dev environment
env:
ENV: ${{ vars.env }}
USERNAME: ${{ secrets.anypoint_username }}
PASSWORD: ${{ secrets.anypoint_password }}
ANYPOINT_USERNAME: ${{ secrets.anypoint_platform_username }}
ANYPOINT_PASSWORD: ${{ secrets.anypoint_platform_password }}
run: |
artifactName=$(ls *.jar | head -1)
mvn deploy -s .maven/settings.xml -f pom.xml -DmuleDeploy \
-Denv=$ENV \
-Dmule.artifact=$artifactName \
-Danypoint.username=”$USERNAME” \
-Danypoint.password=”$PASSWORD” \
-Danypoint_platform_username=”$ANYPOINT_USERNAME” \
-Danypoint_platform_password=”$ANYPOINT_PASSWORD”
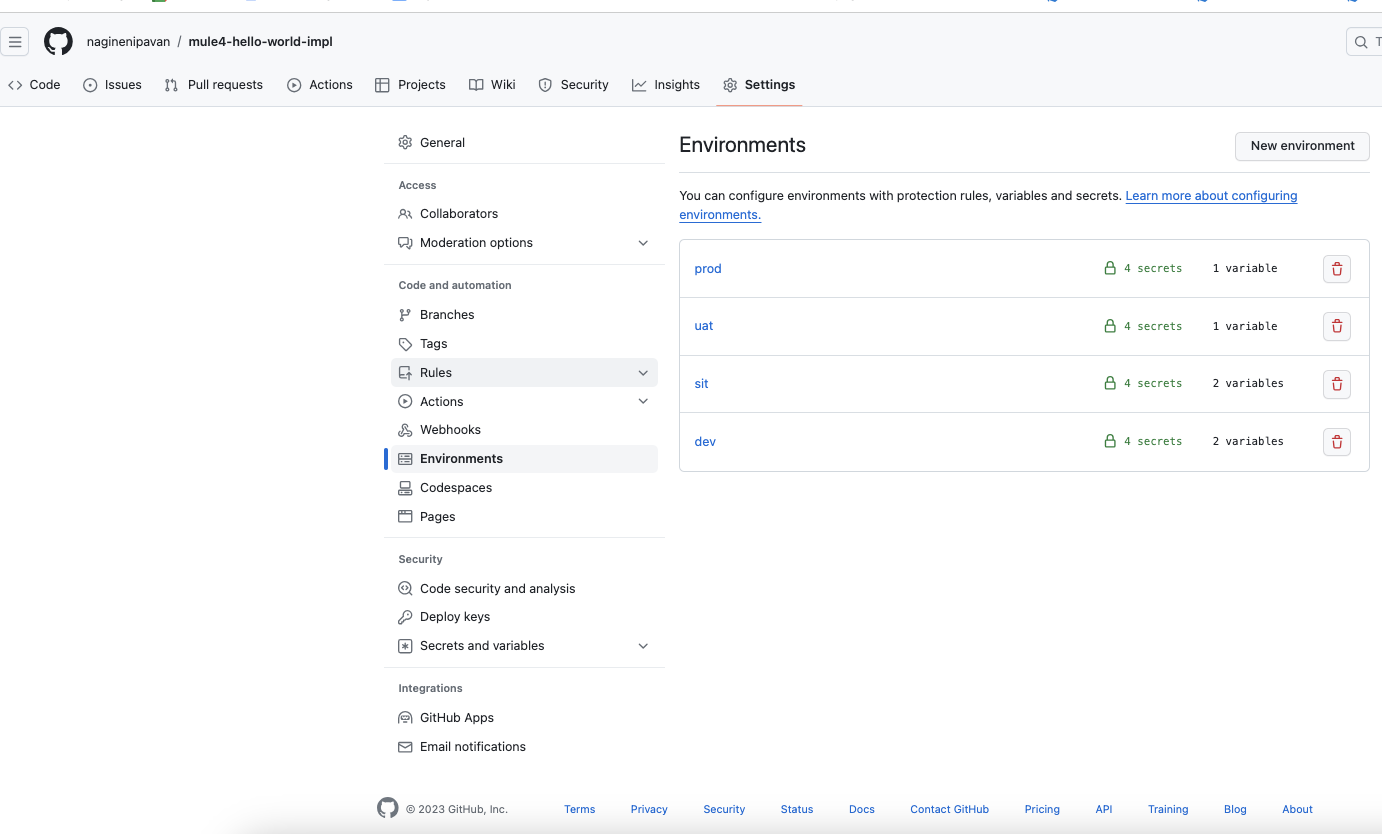
Setup the environments on Repository:
- We can set up multiple environments on the GitHub Repository to deploy the project to multiple environments.
- For this, We need to go to the Project Settings and Environments section and add the environments.
Setup the environment variables on Repository:
- After creating the environment variables, it’s time to create the required environment variables that are used by the GitHub Action.
- Create the below environment variables in dev environment
- ENV: dev
- APP_NAME: mule4-hello-world-impl-pavann-dev
- Secrets:
- ANYPOINT_USERNAME
- ANYPOINT_PASSWORD
- ANYPOINT_PLATFORM_USERNAME
- ANYPOINT_PLATFORM_PASSWORD
- Here, the first username and password are the Anypoint Platform access credentials to deploy the API, and the last two usernames and passwords are the dev environment API Manager connectivity platform credentials.
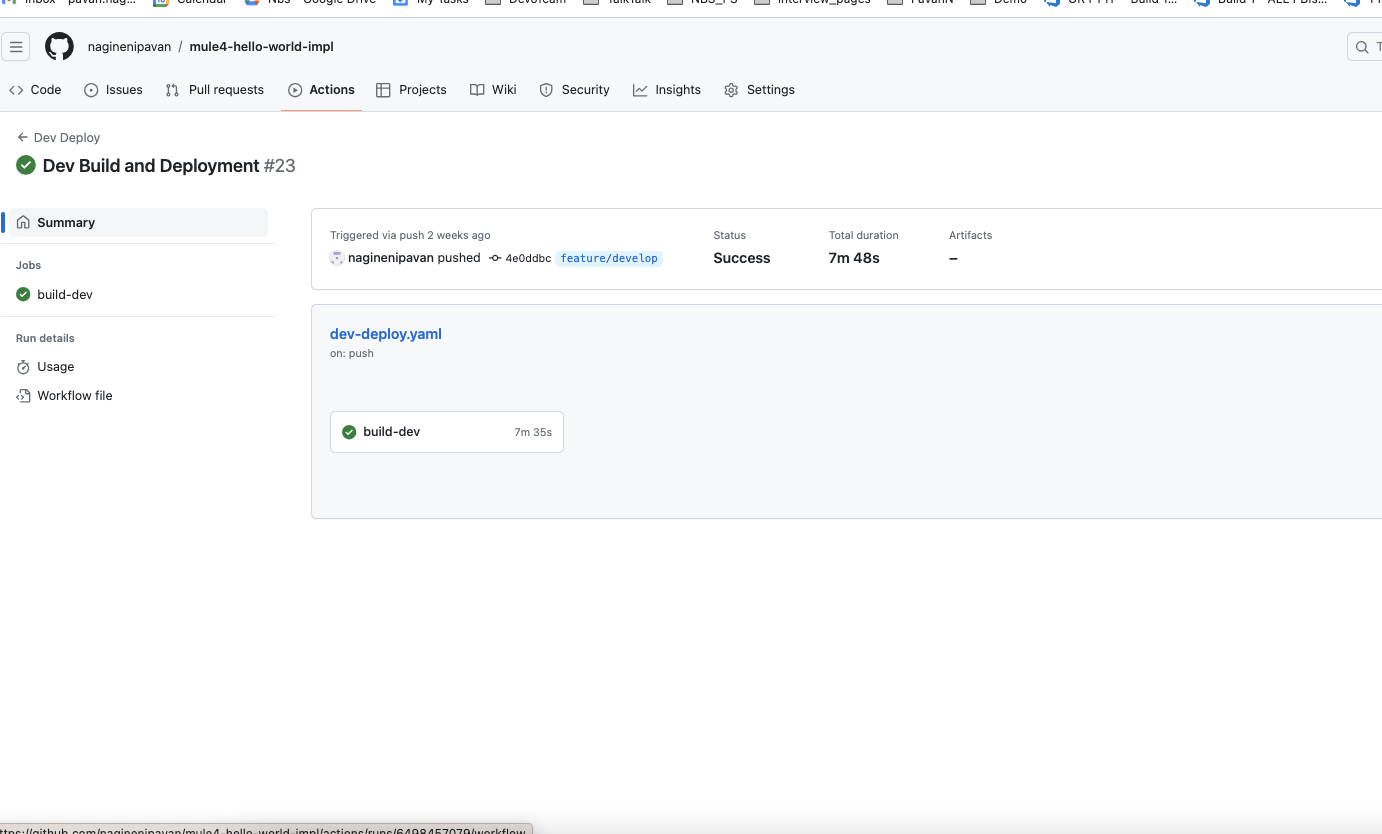
Run the pipeline:
- With this setup on the API Github repository, any changes to the repository in the feature/* branches can trigger this GitHub Action automatically.
- You can go into the Actions tab to see the workflows. We can also click on the job to see the logs of each step included in the job, which will help debug the GitHub Action.
The second workflow we discussed to “compile/test/run unit tests and deploy the Project in SIT environment when any change happens to develop branch” also looks like the same as the first GitHub workflow we developed above other than the environment change. We will just change the environment and environment variables to deploy. Below is the GitHub Workflow(Action) for the same:
Conclusion:
In this chapter, we delved deeper into the intricacies of Continuous Integration (CI) and its implementation using GitHub Actions.
CI, a cornerstone of modern software development, is where developers frequently merge code changes into a shared repository. This continuous merging allows for swift detection of defects, as each change is usually small and can be quickly verified through automated builds and tests.
We discussed the importance of a structured CI/CD release plan, particularly in MuleSoft API. By leveraging a custom branching strategy, developers can streamline the process of building, testing, and deploying their projects. The blog outlines four distinct workflows, each catering to different stages of the development lifecycle, from initial feature development to final production deployment.
We looked at the practical implementation of these workflows using GitHub Actions and guided you in setting up repositories, defining environment variables, and crafting workflows to automate the CI process.
In summary, this blog is a comprehensive guide for those looking to harness the power of CI and GitHub Actions in their MuleSoft API projects. By breaking down the CI/CD release plan into manageable workflows, developers can ensure a smooth and efficient development process, from code integration to deployment.
If you want to discuss CI/CD further and learn how to better implement GitHub Actions. Get in touch with one of our experts here.

